AO2 runs into autorun.inf
Some days ago I bought this USB Hard Drive and when I first plugged it in, the mounted filesystem showed up in the File Manager with a custom icon, so I thought I could use my own custom icon instead and it turned out to be quite easy.
In order to add such custom icon to your USB storage devices, you need an ICO file and an autorun.inf file both in the root of the filesystem. The nice thing is that this stuff works not only in Windows and for CDs, the custom icon shows fine for any storage device and even in GNOME on Unix systems, I don't know about other DEs or OSes tho.
I like the idea of using the “ao2” brand and logo more often even off-line (ah, the ao2 T-shirt looks awesome BTW), but let's get back on topic: here's how I did it on a boring Sunday evening.
The icon
To build an icon with transparency I start from png files and use some shell scripting to convert and assemble a proper ICO file. The script uses Netpbm, you just need to specify the images, grouping them by color depth.
#!/bin/sh

# Convert and assemble a series of PNG files to an ICO file
# Copyright (C) 2010 Antonio Ospite
# Dependencies: mktemp, netpbm
# Limitations: No whitespaces (or other weirdness) in filenames, KISS

# Microsoft recommends including at least the following formats in each icon
# (size and bits-per-pixel):
#
# 16 x 16 - 4 bpp
# 32 x 32 - 4 bpp
# 48 x 48 - 8 bpp
#
FILES_4bpp="icon_16x16.png logo_32x32.png"
FILES_8bpp="logo_48x48.png"


_TMP="$(mktemp -d)"

# Convert image, extract alpha mask
my_convert()
{
  FILENAME="$1"
  NCOLORS=$2

  BASE_NAME=$(basename "$FILENAME" .png)

  pngtopnm -background "#000" -mix "$FILENAME" > "${_TMP}/${BASE_NAME}_tmp.ppm"
  pnmquant $NCOLORS "${_TMP}/${BASE_NAME}_tmp.ppm" > "${_TMP}/${BASE_NAME}.ppm"
  pngtopnm -alpha "$FILENAME" > "${_TMP}/${BASE_NAME}_mask.pgm"
}


for f in $FILES_4bpp;
do
  my_convert "$f" 16
done

for f in $FILES_8bpp;
do
  my_convert "$f" 256
done

# Assemble the result
ARGS=""
for f in $FILES_4bpp $FILES_8bpp;
do
  BASE_NAME=$(basename "$f" .png)
  ARGS="$ARGS ${_TMP}/${BASE_NAME}.ppm ${_TMP}/${BASE_NAME}_mask.pgm"
done

ppmtowinicon -andpgms -output autorun.ico $ARGS
rm -r ${_TMP}
Check out also Creating Windows XP Icons for some more info about Windows compatibility.
autorun.inf
The syntax of autorun.inf is that of INI files, see the Autorun.inf Wikipedia article for the supported keys and values, in my simple case I added:
[autorun]
icon=autorun.ico
action=ao2.it - Theorist Attacks

; Note: Using "shellexecute" will also change the default action
; in the File Manager.
shellexecute=http://ao2.it
; But using an undefined shell verb does the trick of restoring
; the original default action can be restored with something like:
shell=foo

; if we use "open" instead, the default action in the File Manager
; is not changed, but we have to rely on some other trick to open
; a document, like ShelExec: http://www.naughter.com/shelexec.html
;open=cmd /c start http://ao2.it
;open=ShelExec.exe http://ao2.it

; Add a menu entry
;shell\ao2=ao2.it - Theorist Attacks
;shell\ao2\command=ShelExec.exe http://ao2.it
The comments above report all the experiments I did, I am leaving them here just for the record.
I find the shell=whatever trick quite nifty, without it the shellexecute action under Windows will always be the default one when you double click on the device icon, which can be annoying; I discovered it with the good old “let's see what happens if...” method, I couldn't find it documented anywhere.
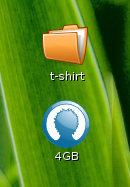
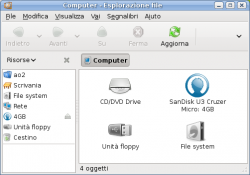
Attached there are screenshots of a USB drive on GNOME desktop and in the Nautilus file manager.
Notes
The command line tools I used to automate the process can handle up to 8-bpp images with 1-bit alpha, in oder to use 32-bpp icons with 8-bit alpha you can use The GIMP to assemble the ICO file, check out this great guide: Creating a multi-resolution favicon including transparency with the GIMP.
When you test your own icon you might want to refresh cached icons, on GNOME you just have to restart Nautilus:
$ nautilus -q
for Windows specific instructions look at Rebuild icon cache to fix incorrectly displayed icons.


![Valida il feed RSS [RSS Valido]](https://ao2.it/sites/default/files/valid-rss-rogers.png)

Commenti
Invia nuovo commento